
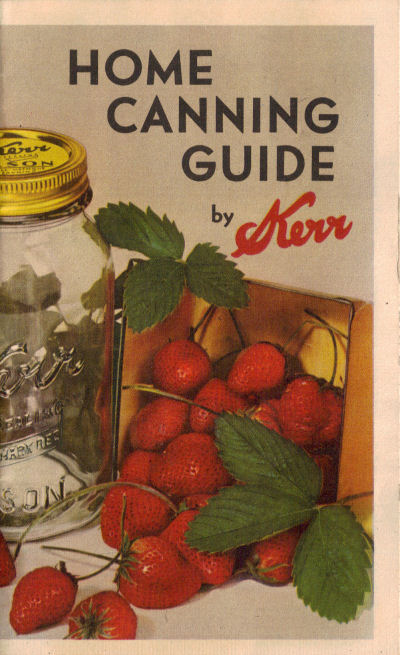
 Here are pages 2, 3 and 4 of the vintage Home Canning Guide by Kerr that was published in 1941. Page 1 is the cover, page 2 is the inside cover, page 3 is an introduction to Kerr canning products, those pages are scanned and you can view them below. Page 4 is retyped below along with a scanned copy.
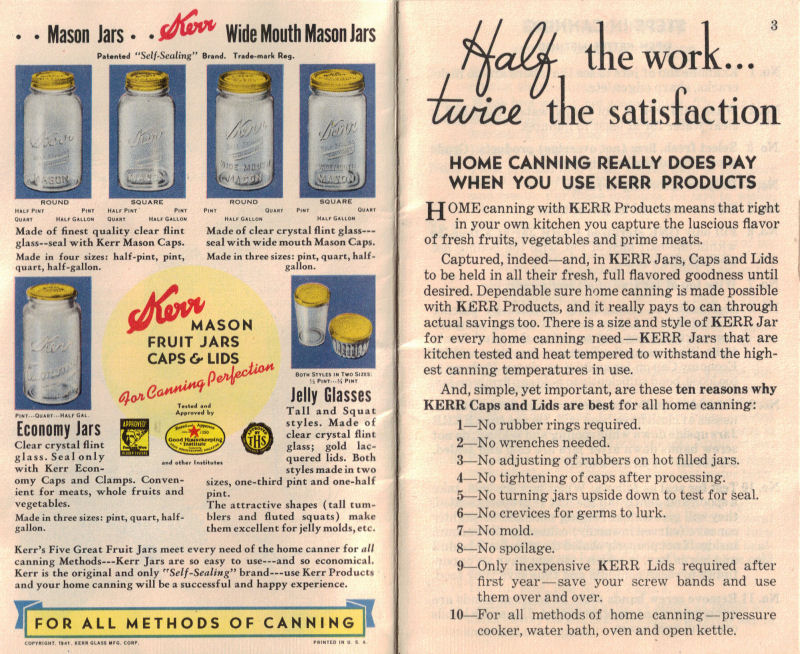
To view all the pages in this booklet, please visit the Home Canning Guide: Kerr Category. The images are clickable if you’d like to view a larger copy.
Also, please make sure to read Important: Safe Canning & Food Preservation before using any recipes or instructions regarding home canning, things have changed since this booklet was published.
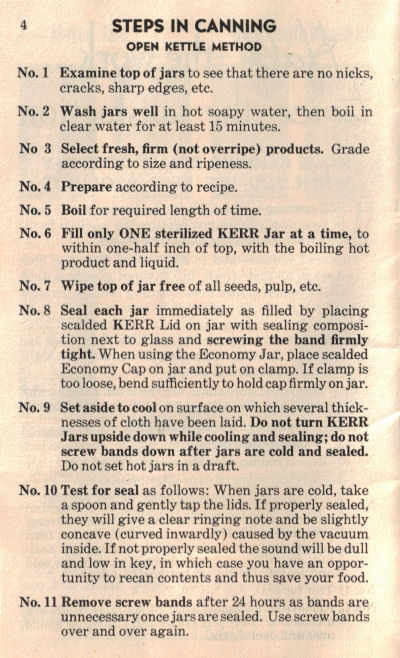 STEPS IN CANNING
OPEN KETTLE METHOD
No. 1 Examine top of jars to see that there are no nicks, cracks, sharp edges, etc.
No. 2 Wash jars well in hot soapy water, then boil in clear water for at least 15 minutes.
No. 3 Select fresh, firm (not overripe) products. Grade according to size and ripeness.
No. 4 Prepare according to recipe.
No. 5 Boil for required length of time.
No. 6 Fill only ONE sterilized KERR Jar at a time, to within one-half inch of top, with the boiling hot product and liquid.
No. 7 Wipe top of jar free of all seeds, pulp, etc.
No. 8 Seal each jar immediately as filled by placing scalded KERR Lid on jar with sealing composition next to glass and screwing the band firmly tight. When using the Economy Jar, place scalded Economy Cap on jar and put on clamp. If clamp is too loose, bend sufficiently to hold cap firmly on jar.
No. 9 Set aside to cool on surface on which several thicknesses of cloth have been laid. Do not turn KERR Jars upside down while cooling and sealing; do not screw bands down after jars are cold and sealed. Do not set hot jars in a draft.
No. 10 Test for seal as follows: When jars are cold, take a spoon and gently tap the lids. If properly sealed, they will give a clear ringing note and be slightly concave (curved inwardly) caused by the vacuum inside. If not properly sealed the sound will be dull and low in key, in which case you have an opportunity to recan contents and thus save your food.
No. 11 Remove screw bands after 24 hours as bands are unnecessary once jars are sealed. Use screw bands over and over again.
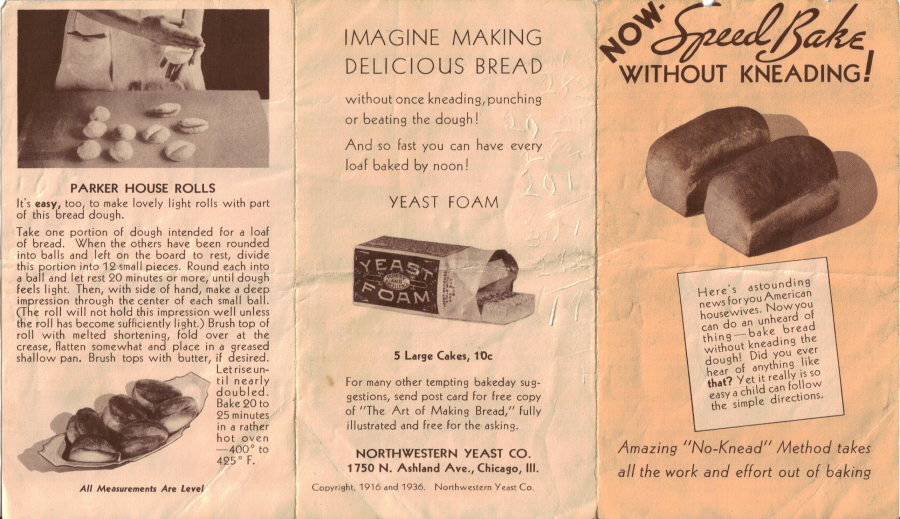
This is a folded recipe sheet from NorthWestern Yeast Co. published in 1936. The full sheet is typed below along with scanned copies, you can click them to view larger if you like.
NOW
Speed Bake
WITHOUT KNEADING!
Here’s astounding news for you American housewives. Now you can do an unheard of thing–bake bread without kneading the dough! Did you ever hear of anything like that? Yet it really is so easy a child can follow the simple directions.
Amazing “No-Knead” Method takes all the work and effort out of baking
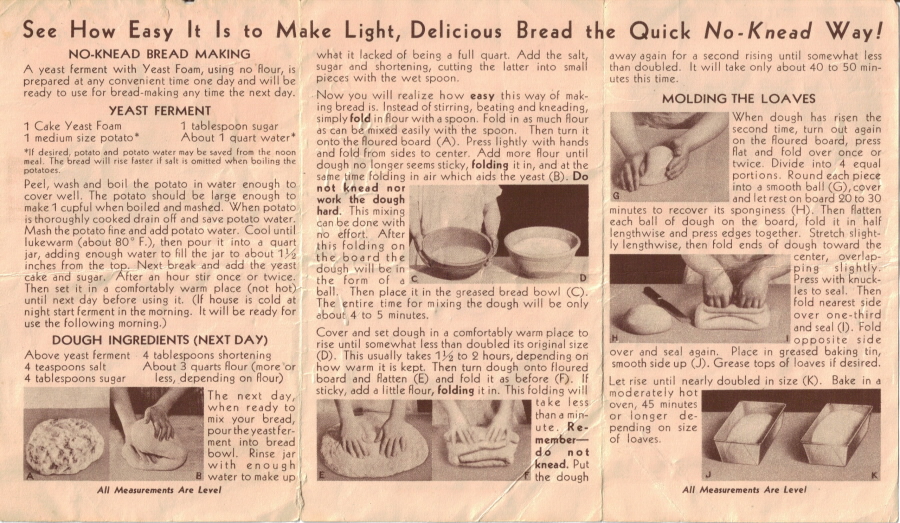
See How Easy It Is to Make Light, Delicious Bread the Quick No-Knead Way!
NO-KNEAD BREAD MAKING
A yeast ferment with Yeast Foam, using no flour, is prepared at any convenient time one day and will be ready to use for bread-making any time the next day.
YEAST FERMENT
1 Cake Yeast Foam
1 medium size potato*
1 tablespoon sugar
About 1 quart water*
*If desired, potato and potato water may be saved from the noon meal. The bread will rise faster if salt is omitted when boiling the potatoes.
Peel, wash and boil the potato in water enough to cover well. The potato should be large enough to make 1 cupful when boiled and mashed. When potato is thoroughly cooked drain off and save potato water. Mash the potato fine and add potato water. Cool until lukewarm (about 80° F.), then pour it into a quart jar, adding enough water to fill the jar to about 1 1/2 inches from the top. Next break and add the yeast cake and sugar. After an hour stir once or twice. Then set it in a comfortably warm place (not hot) until next day before using it. (If house is cold at night start ferment in the morning. It will be ready for use the following morning.)
DOUGH INGREDIENTS (NEXT DAY)
Above yeast ferment
4 teaspoons salt
4 tablespoons sugar
4 tablespoons shortening
About 3 quarts flour (more or less, depending on flour)
The next day, when ready to mix your bread, pour the yeast ferment into bread bowl. Rinse jar with enough water to make up what it lacked of being a full quart. Add the salt, sugar and shortening, cutting the latter into small pieces with the wet spoon.
Now you will realize how easy this way of making bread is. Instead of stirring, beating and kneading, simply fold in flour with a spoon. Fold in as much flour as can be mixed easily with the spoon. Then turn it onto the floured board (A). Press lightly with hands and fold from sides to center. Add more flour until dough no longer seems sticky, folding it in, and at the same time folding in air which aids the yeast (B). Do not knead nor work the dough hard. This mixing can be done with no effort. After this folding on the board the dough will be in the form of a ball. Then place it in the greased bread bowl (C). The entire time for mixing the dough will be only about 4 to 5 minutes.
Cover and set dough in a comfortably warm place to rise until somewhat less than doubled its original size (D). This usually takes 1 1/2 to 2 hours, depending on how warm it is kept. Then turn dough onto floured board and flatten (E) and fold it as before (F). If sticky, add a little flour, folding it in. This folding will take less than a minute. Remember–do not knead. Put the dough away again for a second rising until somewhat less than doubled. It will take only about 40 to 50 minutes this time.
MOLDING THE LOAVES
When dough has risen the second time, turn out again on the floured board, press flat and fold over once or twice. Divide into 4 equal portions. Round each piece into a smooth ball (G), cover and let rest on board 20 to 30 minutes to recover its sponginess (H). Then flatten each ball of dough on the board, fold it in half lengthwise and press edges together. Stretch slightly lengthwise, then fold ends of dough toward the center, overlapping slightly. Press with knuckles to seal. Then fold nearest side over one-third and seal (I). Fold opposite side over and seal again. Place in greased baking tin, smooth side up (J). Grease tops of loaves if desired.
Let rise until nearly doubled in size (K). Bake in a moderately hot oven, 45 minutes or longer depending on size of loaves.
PARKER HOUSE ROLLS
It’s easy, too, to make lovely light rolls with part of this bread dough.
Take one portion of dough intended for a loaf of bread. When the others have been rounded into balls and left on the board to rest, divide this portion into 12 small pieces. Round each into a ball and let rest 20 minutes or more, until dough feels light. Then, with side of hand, make a deep impression through the center of each small ball. (The roll will not hold this impression well unless the roll has become sufficiently light.) Brush top of roll with melted shortening, fold over at the crease, flatten somewhat and place in a greased shallow pan. Brush tops with butter, if desired. Let rise until nearly doubled. Bake 20 to 25 minutes in a rather hot oven–400° to 425° F.
All Measurements Are Level
IMAGINE MAKING DELICIOUS BREAD
without once kneading, punching or beating the dough!
And so fast you can have every loaf baked by noon!
YEAST FOAM
5 Large Cakes, 10c
This is a recipe pamphlet from Dromedary for their Gingerbread Mix and Dates. There’s no date anywhere but this would have been published shortly after WWII since it mentions food shortages easing. The full sheet is typed below along with scans of both sides, you can click them to view a larger copy.
 Soon you’ll have all these fine Dromedary Foods again!
START LOOKING FOR THEM ON YOUR GROCER’S SHELVES
As shortages ease, more and more Dromedary products will reappear at your grocer’s. Watch for them. Ask for them. Every one of them makes a delicious addition to your table. Every one saves you time and work. A boon to busy home-makers (and their grateful families!) Naturally, they’re all Dromedary top quality . . . the very finest in food!
LUSCIOUS WAYS TO BAKE DROMEDARY GINGERBREAD MIX
SAVE YOUR PRECIOUS SUGAR: Bake your most delicious home-made desserts with Dromedary Gingerbread Mix. World’s most famous recipe . . . yet all you do is add water . . . right from the tap!
Dromedary Mix is based on the treasured (and justly famous) recipe of George Washington’s mother. Accurately blended of the choicest, most wholesome ingredients obtainable, Dromedary Mix makes rich, delectable gingerbread . . . finest you can bake or buy. Still it actually costs you less to use Dromedary than to buy all the makings yourself!
Toppings illustrated take little or no sugar.
WITH ICE CREAM (OR WHIPPED CREAM): America’s No. 1 Dessert! Especially delicious when gingerbread is served hot.
CUP CAKES: Add one cup water to Mix. Fill greased muffin pans 1/2 full. Bake in moderate oven (350°) about 20 minutes. Fill with fluffy cream cheese or applesauce. Or frost them. A nourishing lunch box treat.
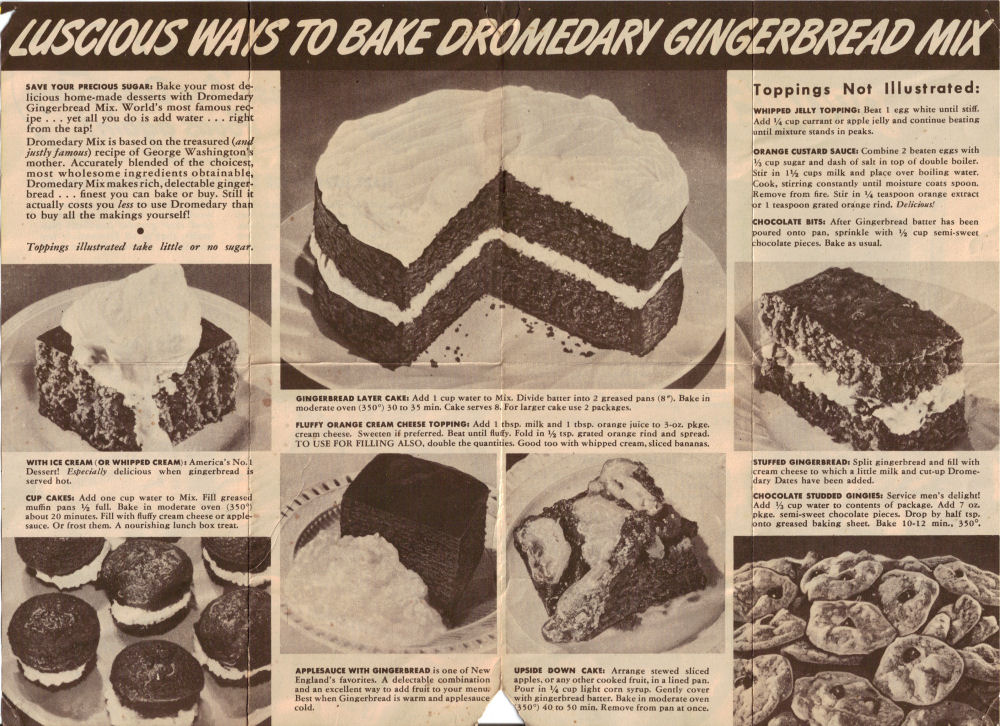
GINGERBREAD LAYER CAKE: Add 1 cup water to Mix. Divide batter into 2 greased pans (8″). Bake in moderate oven (350°) 30 to 35 min. Cake serves 8. For larger cake use 2 packages.
FLUFFY ORANGE CREAM CHEESE TOPPING: Add 1 tbsp. milk and 1 tbsp. orange juice to 3-oz. pkge. cream cheese. Sweeten if preferred. Beat until fluffy. Fold in 1/2 tsp. grated orange rind and spread. TO USE FOR FILLING ALSO, double the quantities. Good too with whipped cream, sliced bananas.
APPLESAUCE WITH GINGERBREAD is one of New England’s favorites. A delectable combination and an excellent way to add fruit to your menu. Best when Gingerbread is warm and applesauce cold.
UPSIDE DOWN CAKE:
Arrange stewed sliced apples, or any other cooked fruit, in a lined pan. Pour in 1/4 cup light corn syrup. Gently cover with gingerbread batter. Bake in moderate oven (350°) 40 to 50 min. Remove from pan at once.
Toppings Not Illustrated:
WHIPPED JELLY TOPPING: Beat 1 egg white until stiff. Add 1/4 cup currant or apple jelly and continue beating until mixture stands in peaks.
ORANGE CUSTARD SAUCE: Combine 2 beaten eggs with 1/3 cup sugar and dash of salt in top of double boiler. Stir in 1 1/2 cups milk and place over boiling water. Cook, stirring constantly until moisture coats spoon. Remove from fire. Stir in 1/4 teaspoon orange extract or 1 teaspoon grated orange rind. Delicious!
CHOCOLATE BITS: After Gingerbread batter has been poured onto pan, sprinkle with 1/2 cup semi-sweet chocolate pieces. Bake as usual.
STUFFED GINGERBREAD: Split gingerbread and fill with cream cheese to which a little milk and cut-up Dromedary Dates have been added.
CHOCOLATE STUDDED GINGIES: Service men’s delight! Add 1/3 cup water to contents of package. Add 7 oz. pkge. semi-sweet chocolate pieces. Drop by half tsp. onto greased baking sheet. Bake 10-12 min., 350°.
 The Only Pasteurized Dates
DROMEDARY
Nature’s most delicious confection–dates! And so rich in food energy and minerals that people have lived for days on dates and water alone! Only Dromedary Dates are pasteurized for your protection. A wholesome, easily digested sweet for grown-ups and children alike.
P.S. Dates help keep you “regular”.
EAT THEM LIKE CANDY
Ever notice how guests make a bee-line for dates? Always the most popular refreshment at any gathering.
STUFFED DATES: Try ground nuts and raisins. Or peanut butter, or walnut halves. Best of all, cream cheese and shredded coconut. If you like a sugar coating, shake 5 or 6 dates at a time in a paper bag containing 1/3 cup granulated sugar.
This recipe was clipped from packaging of some kind, probably a bag of flour. Date is unknown. The recipe is typed below as well as a scanned copy.
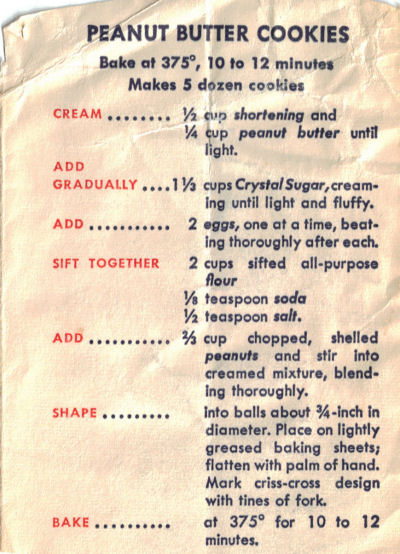
PEANUT BUTTER COOKIES
Bake at 375°, 10 to 12 minutes
Makes 5 dozen cookies
CREAM . . . 1/2 cup shortening and
1/4 cup peanut butter until light.
ADD
GRADUALLY . . . 1 1/3 cups Crystal Sugar, creaming until light and fluffy.
ADD . . . 2 eggs, one at a time, beating thoroughly after each.
SIFT TOGETHER . . . 2 cups sifted all-purpose flour
1/8 teaspoon soda
1/2 teaspoon salt.
ADD . . . 2/3 cup chopped, shelled peanuts and stir into creamed mixture, blending thoroughly.
SHAPE . . . into balls about 3/4-inch in diameter. Place on lightly greased baking sheets; flatten with palm of hand. Mark criss-cross design with tines of fork.
BAKE . . . at 375° for 10 to 12 minutes.
This recipe is a full page advertisement clipped from a magazine published in 1950. The full recipe is typed below along with a scan (click to view larger), it’s a bit too large for my scanner but I was able to capture most of it.
 Yummy Swiss Chocolate Cake
SO EASY, TOO . . . . IT’S A “GUESSING-GONE” RECIPE!
A new thrill–Swiss Chocolate Layer Cake peaked with fluffy almond frosting! So good you’ll want to yodel!
The secret of the Swiss-y flavor? It’s the unusual liquid ingredient. And, of course, the secret of the delicate lightness and velvety tenderness is your old favorite–Swans Down Cake Flour.
With a “guessing-gone” recipe to follow, you can’t go wrong–the strokes are counted for you–every step tested.
Make this Swiss Chocolate Layer Cake with the exciting “candy-bar” flavor tonight. But remember, you can’t get superfine Swans Down quality in your cake–without Swans Down Cake Flour.
**P.S. Have you tried Swans Down Instant Cake Mix . . . the only cake mix made with Swans Down?
SWISS CHOCOLATE LAYER CAKE
Preparations. Have shortening at room temperature. Line bottoms of pans with paper; grease. Use two round 9-inch layer pans, 1 1/2 inches deep. Start oven for moderate heat, (350&Deg;F.). Sift flour once before measuring.
Measure into sifter:
1 3/4 cups sifted Swans Down Cake Flour
2 teaspoons Calumet Baking Powder
1/4 teaspoon soda
1 teaspoon salt
1 1/2 cups sugar
Measure into mixing bowl:
1/2 cup shortening
Measure into cup:
*Undiluted evaporated milk (see below for amount)
1 teaspoon vanilla
Have ready:
2 eggs, unbeaten
**2 squares Baker’s Unsweetened Chocolate, melted
*With butter, margarine, or lard, use 1 cup plus 2 tablespoons undiluted evaporated milk. With vegetable or any other shortening, use 1 1/4 cups undiluted evaporated milk.
**For stronger chocolate flavor, use 2 1/2 squares Baker’s Unsweetened Chocolate.
Now–Swans Down’s “Guessing-Gone” part!
1. Stir shortening just to soften. Sift in dry ingredients. Add one cup milk and mix until all flour is dampened. Then beat 300 strokes by hand, or 2 minutes in mixer at a low speed.
2. Add remaining milk, eggs, and melted chocolate and beat 150 strokes by hand, or 1 minute in mixer at a low speed.
(Count only actual beating strokes or beating time. Scrape bowl and spoon or beater often.)
Baking. Turn batter into pans. Bake in moderate oven (350°F.) 30 to 35 minutes.
Cooling. Cool cake in pans on racks 5 minutes, before turning out to finish cooling.
Frosting. Frost with Almond Seven-Minute Frosting. Decorate with chopped toasted almonds.
Almond Seven-Minute Frosting.
Combine 2 egg whites, 1 1/2 cups sugar, dash of salt, 1/3 cup water, and 2 teaspoons light corn syrup in double boiler. Beat with rotary egg beater 1 minute, or until thoroughly mixed. Cook over rapidly boiling water, beating constantly, 7 minutes, or until frosting will stand up in stiff peaks. Remove from water, add 1/2 teaspoon almond extract and 1/4 teaspoon vanilla, and beat 1 minute, or until thick enough to spread.
For fine cake–use cake flour!
For superfine cake–Swans Down
This is a full page recipe advertisement for Betty Crocker clipped from a magazine, date published is 1948. The page is a bit too large for my scanner but I was able to capture most of it, picture is below (clickable to view larger if you like). Recipe is typed in full below as well.
 AT LAST! Angel Food Lightness + Butter Cake Richness + Real Chocolate Flavor!
Betty Crocker Cocoa “Chiffon”
Cocoa “Chiffon” is Biggest Cake News in 100 Years!
Really, a new type of cake . . . more exciting than any cake ever known before. This new Betty Crocker Cocoa Chiffon creation is indescribably lovely–good to eat. It keeps fresh amazingly long, too. That’s due to the surprise shortening. More tender than angel food–when made with SOFTASILK, the cake flour our Betty Crocker Staff recommends. Softasilk permits eggs and baking powder to exert their full rising action . . . gives amazing volume and delicacy. Try the recipe at right.
Betty Crocker Cocoa Chiffon
(WITH HOBNAIL ICING)
You can make it in any of the pans shown under STEP 3 below.
Important: This recipe is for SOFTASILK (The Betty Crocker) Cake Flour only. Using any other flour risks a failure.
LARGE CAKE
(16 to 20 Servings)
Preheat oven (see pan sizes and corresponding temperatures below). SIFT an ample amount of SOFTASILK Cake Flour onto a square of paper.
STEP 1 . . . STIR until smooth. Cool:
3/4 cup boiling water
1/2 cup cocoa
MEASURE (level measurements) and SIFT together into mixing bowl:
1 3/4 cups sifted SOFTASILK (spoon lightly into cup, don’t pack)
1 3/4 cups sugar
3 tsp. baking powder
1 tsp. salt
MAKE a well and add in order:
1/2 cup cooking (salad) oil such as Wesson or Mazola
7 unbeaten egg yolks (medium-sized)
the cooled cocoa mixture
1 tsp. vanilla
1/4 tsp. red food coloring, if desired
BEAT with spoon until smooth.
STEP 2 . . . MEASURE into large mixing bowl:
1 cup egg whites (7 or 8)
1/2 tsp. cream of tartar
WHIP until whites form very stiff peaks. They should be much stiffer than for angel food or meringue. DO NOT UNDERBEAT.
STEP 3 . . . POUR egg yolk mixture gradually over whipped egg whites–gently folding with rubber scraper just until blended. DO NOT STIR! Pour into ungreased pan immediately. Bake in:
10-in. tube, 4-in. deep–
325°–55 min., then
350°–10 to 15 min.
9x13x2-in. oblong–
350°–45 to 50 min.
. . . or until top springs back when lightly touched.
SMALLER CAKE
(8 to 10 Servings)
Preheat oven (see pan sizes and corresponding temperatures below). SIFT an ample amount of SOFTASILK Cake Flour onto a square of paper.
STEP 1 . . . STIR until smooth. Cool:
3/8 cup boiling water (1/4 cup plus 2 tbsp.)
1/4 cup cocoa
MEASURE (level measurements) and SIFT together into mixing bowl:
7/8 cup (3/4 cup plus 2 tbsp.)
sifted SOFTASILK (spoon lightly into cup, don’t pack)
7/8 cup sugar
1 1/2 tsp. baking powder
1/2 tsp. salt
MAKE a well and add in order:
1/4 cup cooking (salad) oil such as Wesson or Mazola
4 unbeaten egg yolks (medium-sized)
the cooled cocoa mixture
1/2 tsp. vanilla
1/8 tsp. red food coloring, if desired
BEAT with spoon until smooth.
STEP 2 . . . MEASURE into large mixing bowl:
1/2 cup egg whites (4 whites)
1/4 tsp. cream of tartar
WHIP until whites form very stiff peaks. They should be much stiffer than for angel food or meringue. DO NOT UNDERBEAT.
STEP 3 . . . POUR egg yolk mixture gradually over whipped egg whites–gently folding with rubber scraper just until blended. DO NOT STIR! Pour into ungreased pan immediately. Bake in:
8x8x2-in. or 9x9x2-in. square–350°–30 to 35 min.
5x10x3-in. loaf–325°–50 to 55 min.
9-in. tube, 3 1/2-in. deep–325°–50 to 55 min.
. . . or until top springs back when lightly touched.
Immediately turn pan upside down, placing tube part over neck of funnel or bottle, or resting edges of square, oblong or loaf pans on two other pans. Let hang, free of table, until cold. Loosen from sides and tube with spatula. Turn pan over and hit edge sharply on table to loosen. Delicious uniced, or . . .
HOBNAIL ICING. Place bowl in ice water, beat with rotary beater until consistency to spread (3 to 5 minutes) 1 cup sifted confectioners’ sugar; 2 or 3 egg yolks (or 1 small egg); 1/4 cup milk; 3 sq. unsweetened chocolate (3 oz.), melted; 1 tbsp. soft shortening; 1/2 tsp. vanilla. Double the recipe for Large Cake. Make Hobnail effect with tip of teaspoon.
This recipe clipping was pasted onto a large white index card, this must have been an article in a magazine since there are smaller clippings with pictures and details stapled to the back of the card. Date is unknown. The recipe is typed out below along with scans of both sides, the main recipe is clickable if you’d like to view a larger copy.
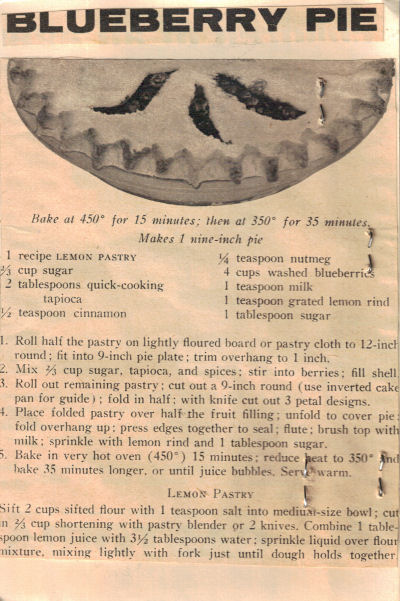 BLUEBERRY PIE
Bake at 450° for 15 minutes; then at 350° for 35 minutes.
Makes 1 nine-inch pie
1 recipe LEMON PASTRY
2/3 cup sugar
2 tablespoons quick-cooking tapioca
1/2 teaspoon cinnamon
1/4 teaspoon nutmeg
4 cups washed blueberries
1 teaspoon milk
1 teaspoon grated lemon rind
1 tablespoon sugar
- Roll half the pastry on lightly floured board or pastry cloth to 12-inch round; fit into 9-inch pie plate; trim overhang to 1 inch.
- Mix 2/3 cup sugar, tapioca, and spices; stir into berries; fill shell.
- Roll out remaining pastry; cut out a 9-inch round (use inverted cake pan for guide); fold in half; with knife cut out 3 petal designs.
- Place folded pastry over half the fruit filling; unfold to cover pie; fold overhang up; press edges together to seal; flute; brush top with milk; sprinkle with lemon rind and 1 tablespoon sugar.
- Bake in very hot oven (450°) 15 minutes; reduce heat to 350° and bake 35 minutes longer, or until juice bubbles. Serve warm.
LEMON PASTRY
Sift 2 cups sifted flour with 1 teaspoon salt into medium-size bowl; cut in 2/3 cup shortening with pastry blender or 2 knives. Combine 1 tablespoon lemon juice with 3 1/2 tablespoons water; sprinkle liquid over flour mixture, mixing lightly with fork just until dough holds together.
- A truly perfect pie begins with a crust that is so tender-crisp it will melt in his mouth. Add a little lemon juice to water when mixing pastry to accent the fruit’s fresh flavor; handle gently, for overmixing toughens crust.
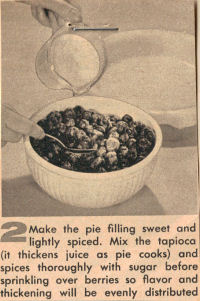
- Make the pie filling sweet and lightly spiced. Mix the tapioca (it thickens juice as pie cooks) and spices thoroughly with sugar before sprinkling over berries so flavor and thickening will be evenly distributed.
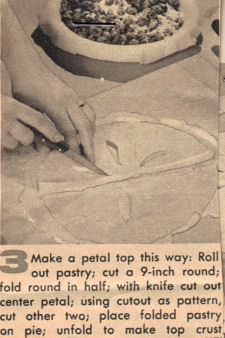
- Make a petal top this way: Roll out pastry; cut a 9-inch round; fold round in half; with knife cut out center petal; using cutout as pattern, cut other two; place folded pastry on pie; unfold to make top crust.
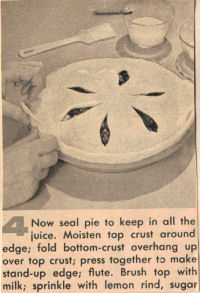
- Now seal pie to keep in all the juice. Moisten top crust around edge; fold bottom-crust overhang up over top crust; press together to make stand-up edge; flute. Brush top with milk; sprinkle with lemon rind, sugar.

|
|
|
|
This recipe was clipped from an old magazine, date is unknown. The recipe is typed below along with scanned copies of both sides of the clipping.
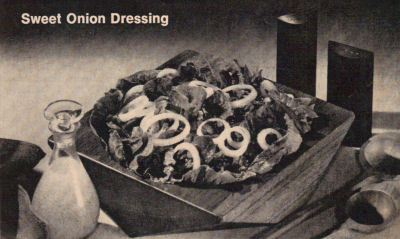
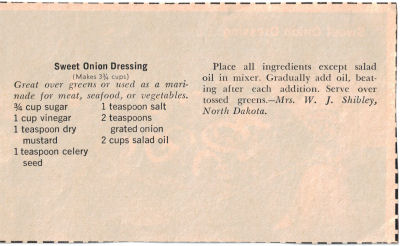
Sweet Onion Dressing
(Makes 3 3/4 cups)
Great over greens or used as a marinade for meat, seafood, or vegetables.
3/4 cup sugar
1 cup vinegar
1 teaspoon dry mustard
1 teaspoon celery seed
1 teaspoon salt
2 teaspoons grated onion
2 cups salad oil
Place all ingredients except salad oil in mixer. Gradually add oil, beating after each addition. Serve over tossed greens.
RecipeCurio.com

-
Subscribe to Feeds:
