This is a two page article pulled from the Poultry Tribune magazine (1957). The article is typed below along with scanned copies of both pages, each scan is clickable if you’d like to view a larger copy. The last recipe on page two for “Cottage Cheese Pinwheel Rolls” carried over to another page that I don’t seem to have, so that recipe is not available (only partial which you can view on the second scan).
The Poultrywoman’s Homemaking Department
Edited by Isabel C. Du Bois
Tips on Baking with Yeast
IF YOU’VE NEVER baked with yeast, you’ve a new culinary experience awaiting you–one that is easy and fun too.
Ingredients used to make yeast goods are simple. Mixing is likewise simple. And no complicated equipment is needed, just the usual bowls, spoons and pans.
So don’t be afraid to bake with yeast. Just follow these few tips and a tested recipe and you’ll be off to a good start.
There are two types of yeast available to Mrs. Homemaker today . . . . fresh compressed yeast which is sold in cake form wrapped in foil or waxed paper. Also dry granular yeast packaged in a vacuum sealed envelope.
Modern dry granular yeast is a fast-actioned product which requires no refrigeration. It contains no filler and is as different from the slow-actioned cake form of dry yeast used in grandmother’s day as is today’s jet bomber different from the first plane.
Look for the Date
To assure dependability, each package is dated on the reverse side. Look for this date when you buy dry yeast and be certain to use within the time limit for satisfactory action. This date may be as much as six months in advance of purchase.
Fresh compressed yeast, in contrast, is a perishable product and must be stored in the refrigerator. Use within a week after purchase for best action.
Few things about yeast cause as much confusion as do the sizes of packages available. Fresh compressed yeast is sold wrapped in foil in a 2/3 and a 3/5 ounce cake. Yeast cakes that are wrapped in waxed paper also come in two sizes . . . one ounce and two ounce.
The weight of a package of dry yeast cannot be compared with the weight of a cake of fresh yeast. In manufacturing dry yeast most of the moisture is removed, consequently it weighs less. Also starch filler is added to fresh yeast to hold the cells together. No filler is added to dry granular yeast.
One package of dry yeast is comparable in action to the 2/3 or 3/5 ounce cake of foil wrapped fresh compressed yeast. In a recipe calling for one cake of yeast use either a package of dry granular or the 2/3 or 3/5 ounce cake of fresh yeast. The one and two ounce sizes are used by homemakers who make large batches of yeast raised goods.
Even though a recipe calls for a cake of fresh yeast a package of dry granular may be substituted with complete confidence. Dry granular yeast was not available when many of our favorite recipes were written.
Heat Kills Yeast
When baking with yeast, the most important point to remember is that it is a live organism. Dry granular yeast takes more kindly to heat than does fresh compressed but hot water will kill both.
For best results it is recommended that dry granular yeast be dissolved in warm water (90 to 95 degrees F.). Water within this temperature range feels slightly warm when a few drops are placed on the wrist. With fresh compressed yeast, however, use only lukewarm water (82 to 85 degrees F.). Water at this temperature feels neither warm nor cold when a few drops are placed on the wrist.
Fresh compressed yeast may be softened in either lukewarm milk or water. However, never attempt to dissolve dry granular yeast in milk. Use warm water only. The fat globules of milk interfere with rapid rehydration of dry granular yeast.
If a recipe calls for milk only and dry granular yeast is substituted, allow 1/4 cup water for dissolving each package of dry yeast being used. Then subtract the amount of water used from the total amount of milk called for in the recipe, adding the difference in milk.
Kneading Blends Ingredients
And don’t be afraid to handle a yeast dough. Unlike a baking powder biscuit dough which must be treated ever so gently, a yeast dough must be kneaded with firmness. Kneading blends all of the ingredients.
Too it works and stretches the gluten of the flour into an elastic framework that will ensnare the bubbles of gas produced by the yeast. As kneading progresses, this framework becomes more completely distributed through the dough and more delicate and tender.
A few minutes of swift, deft handling will knead a batch of dough sufficiently. Too little kneading will produce a heavy soggy product. Too much usually results in a coarse, uneven texture.
And now so that you may put these yeast baking tips to work here are several tested recipes.
The first, filled butter rolls, is not at all tricky. In fact, if directions are followed closely you’ll find it difficult to have a failure.
The recipe makes about four dozen dainty rolls so freeze some of them for later use. Package after baking and cooling in the number that can be used at one time.
Filled Butter Rolls
1 1/4 cups milk
1 cup butter
3/4 cup sugar
1 teaspoon salt
2 packages yeast, compressed or dry granular
1/2 cup water, warm for dry, lukewarm for compressed
2 eggs, beaten
1 teaspoon grated lemon rind
6 cups sifted all-purpose flour, about
Scald milk. Stir in the butter, sugar and salt. Cool until lukewarm. Dissolve yeast in water. Allow to stand a few minutes then stir well. Add yeast, eggs, lemon rind and flour to the milk mixture. Beat well until smooth. Place in a greased bowl, cover with a towel and let rise in a warm place until double in bulk. Punch down and let rise again. When doubled again, turn dough onto a floured board and knead lightly for a few minutes. Roll out portions of dough 1/2-inch thick.
How to Make Round Buns
To make round buns: Cut dough into 2 1/2 inch rounds, place on a greased cookie sheet and with the thumb, make an indentation in the center of each. Fill with a teaspoon of prune or apricot filling.
To make filled bun squares: Cut dough into 4 inch squares; place a teaspoon of filling in the center of each. Moisten corners with water and bring opposite corners to center. Press gently together.
Directions for Making Twists
To make twists: Form strips of dough into ropes and shape into a circle. Place a teaspoon of filling in the center.
Place the rolls on a greased cookie sheet, cover and let rise until double in bulk. Brush lightly with cream and sprinkle streusel topping over some of the rolls. Leave remainder plain. Bake at 375 degrees F. 15 to 20 minutes. After baking, rolls without streusel topping may be brushed with a mixture of 1 cup confectioners’ sugar and 2 tablespoons hot milk while still warm. Yield: About 48 rolls.
Tips for Apricot Filling
To make apricot filling cut 1 pound dried apricots into pieces. All 1 cup water, 2 tablespoons sugar, 1/2 teaspoon cinnamon, 1/4 teaspoon ginger, 1 tablespoon lemon juice and 2 tablespoons butter. Simmer until apricots have softened, stirring occasionally to prevent sticking. Remove from heat and beat well. Yield: About 2 cups filling.
Prune Filling
To make prune filling cut 1 pound dried prunes into pieces and remove seeds. Add 1 1/2 cups water, 2 tablespoons sugar, 1/4 teaspoon cinnamon, 1/4 teaspoon cloves, 1/2 teaspoon grated lemon rind, 2 tablespoons lemon juice and 2 tablespoons butter. Simmer until prunes are cooked, stirring occasionally to prevent sticking. Remove from heat and beat well. Yield: About 2 cups filling.
To make streusel topping combine 1/4 cup brown sugar, 1 tablespoon flour, 1 teaspoon cinnamon, 2 tablespoons melted butter and 1/4 cup chopped nuts. Sprinkle over tops of rolls before baking.
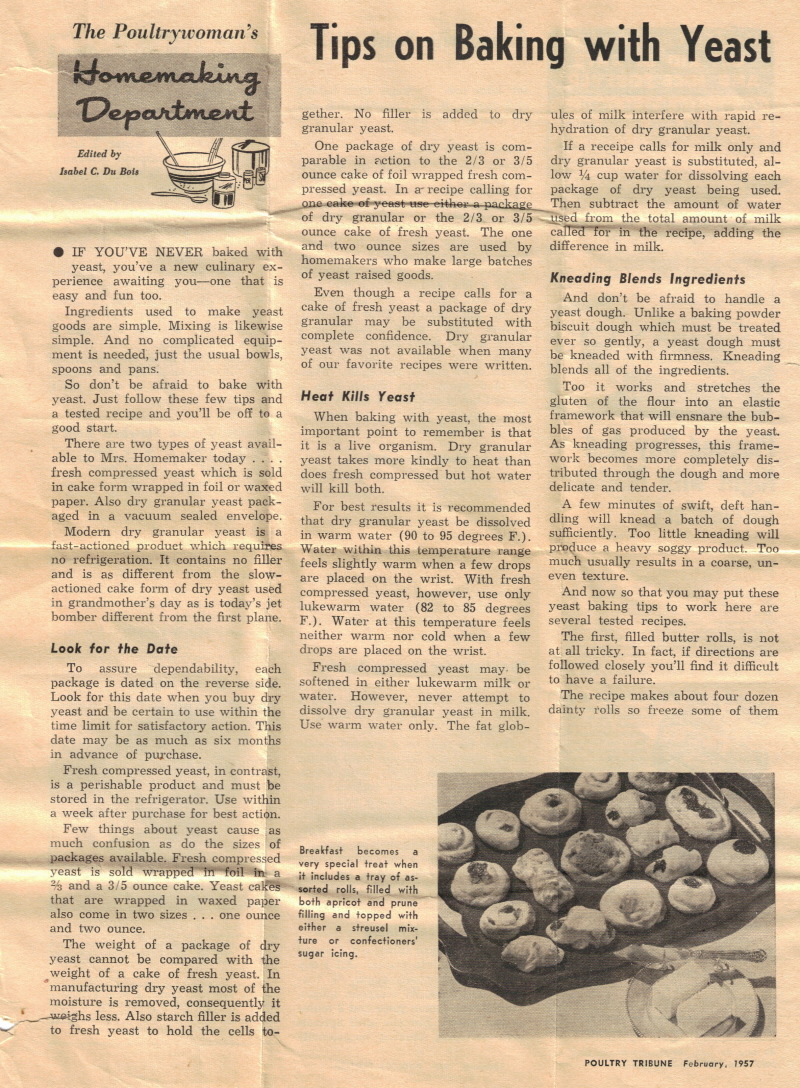
Served hot or as is, these pinwheel rolls will win you praise at breakfast, at lunch with a salad, or with a snack any time of the day.
Cottage Cheese Pinwheel Rolls
*Recipe instructions not complete