Here are pages 2, 3 and 4 of the vintage Home Canning Guide by Kerr that was published in 1941. Page 1 is the cover, page 2 is the inside cover, page 3 is an introduction to Kerr canning products, those pages are scanned and you can view them below. Page 4 is retyped below along with a scanned copy.
To view all the pages in this booklet, please visit the Home Canning Guide: Kerr Category [1]. The images are clickable if you’d like to view a larger copy.
Also, please make sure to read Important: Safe Canning & Food Preservation [2] before using any recipes or instructions regarding home canning, things have changed since this booklet was published.
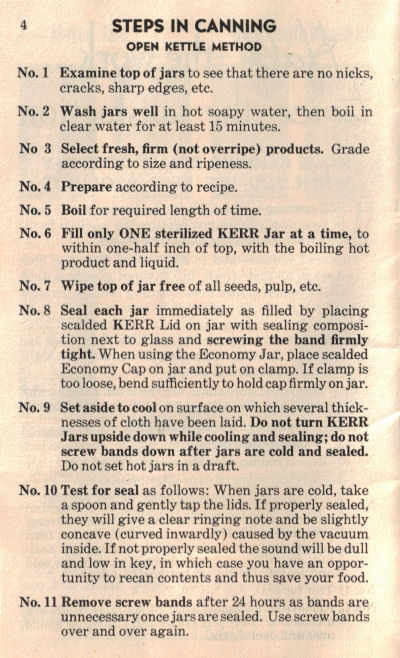
STEPS IN CANNING
OPEN KETTLE METHOD
No. 1 Examine top of jars to see that there are no nicks, cracks, sharp edges, etc.
No. 2 Wash jars well in hot soapy water, then boil in clear water for at least 15 minutes.
No. 3 Select fresh, firm (not overripe) products. Grade according to size and ripeness.
No. 4 Prepare according to recipe.
No. 5 Boil for required length of time.
No. 6 Fill only ONE sterilized KERR Jar at a time, to within one-half inch of top, with the boiling hot product and liquid.
No. 7 Wipe top of jar free of all seeds, pulp, etc.
No. 8 Seal each jar immediately as filled by placing scalded KERR Lid on jar with sealing composition next to glass and screwing the band firmly tight. When using the Economy Jar, place scalded Economy Cap on jar and put on clamp. If clamp is too loose, bend sufficiently to hold cap firmly on jar.
No. 9 Set aside to cool on surface on which several thicknesses of cloth have been laid. Do not turn KERR Jars upside down while cooling and sealing; do not screw bands down after jars are cold and sealed. Do not set hot jars in a draft.
No. 10 Test for seal as follows: When jars are cold, take a spoon and gently tap the lids. If properly sealed, they will give a clear ringing note and be slightly concave (curved inwardly) caused by the vacuum inside. If not properly sealed the sound will be dull and low in key, in which case you have an opportunity to recan contents and thus save your food.
No. 11 Remove screw bands after 24 hours as bands are unnecessary once jars are sealed. Use screw bands over and over again.